Do you know about the email wire fraud scam affecting lawyers and law firms?

Because October is Cyber Security Awareness Month, we thought that we would take the next few weeks to highlight cyber security exposures that are common to law firms.

This week we wanted to talk about wire fraud.  Despite the fact that wire fraud scams target a wide range of professionals, attorneys who handle real estate transactions and/or wire money are particularly at risk.

Lawyers should be aware of any fraud schemes that could cost them and/or their clients hundreds of thousands of dollars if they transfer money to or on behalf of clients. The Federal Bureau of Investigation (FBI) estimates that scammers have stolen up to $1.33 billion just in the United States.

Here’s how the scheme normally works:

  • The scammer will gain control of an email account from at least one of the parties in a transaction.  Typically that transaction will be in real estate.  They will use this access to gain details.
  • The scammer will send a set of emails that appear to be legitimate discussing the details of the deal to build trust
  • Then, the scammer will send wire instructions OR make changes to a previously supplied set of instructions
  • The scammer will say this matter is “urgent” and that everything “needs to be done today”.  This is so the normal set of checks and balances will be bypassed, thus eliminating the normal scrutiny requests like these should get
  • Then, the attorney would unknowingly wire the money to the scammer’s account and the scammer will typically move that money immediately to an overseas account so it cannot be stopped

There are a few ways that attorneys can prevent wire fraud – 

#1 – Be hyper-vigilant

First, attorneys should be on the lookout for wire fraud scams and be skeptical whenever money is being wired to finish any kind of transaction. Wire fraud scams that use emails can involve anyone in a transaction, from someone the attorney has worked with for 40 years to someone they have only met briefly for one transaction. Because of how email works, it is much easier to hide a person’s true name through email than over the phone or in person.

#2 – Use a second authentication factor

Use a phone call as the second authentication factor to easily check on all wire transfer requests.

Before any money is moved out of the law firm for a transaction, an attorney can find out about most possible fraud scams by calling the person who is supposedly sending the email. Attorneys should always use the contact information they already have for the person instead of the information in the email, which could be fake. Lawyers can also call someone else at the company. The main point is to do something outside of the email chain that could be hacked.

#3 – Be skeptical of last minute changes

Be careful when a party in a deal suddenly changes how they usually do things. This could mean moving money to a different account, using a personal email address instead of a work one, or talking to someone else at the company. All of these things could be signs of a possible scam. 

Questions about risk mitigation for this exposure?  Call us at 412.563.2106

Stay tuned for next week where we will send you a website where you can check to see if your email/password combination has been exposed in any major hack.

Keeping Your Information Safe In the Digital Age – Part 3

With the onslaught of data breaches that happened in 2015 (about 65,000 according to the Verizon Data Breach Investigations Report), INF presents this multi-part blog series about keeping your data safe in the digital age.

Accessing Your Password Database on Different Devices

The last blog post of this series covered setting up a password database in KeePass and accessing it on your personal computer.  This blog post will cover accessing your passwords on multiple devices.

Storing your Password Database in an Accessible Place

If you only want access to your passwords on your laptop or desktop, storing the database file (*.kdbx file) locally is fine.  However, if you want to be able to retrieve your passwords from your phone, tablet, etc., the file needs to be stored in a cloud.  If you already have a cloud account, you can store it there.  If you do not have a cloud account and you won’t be using it for large files, Dropbox is great free option to consider (https://www.dropbox.com/).  It takes about 3 minutes to sign up and you get 2GB of space for free.  Your *.kdbx file won’t even use 1% of that amount.

Once you have your Cloud account set up, move your password database file to the cloud.  This benefits you in multiple ways.  First of all, you can access your passwords from all of your devices.  Secondly, your password database will now be backed up on a regular basis.  In fact, Dropbox keeps all deleted and updated versions of your files from the last thirty days.  So, if you accidently delete your file from anywhere, you can restore it from dropbox.com.

Retrieving Passwords on your iPhone or iPad

If you want to access passwords on your iPhone, you need to download the app for the cloud that you are using onto your device. In the case of Dropbox, you will download the Dropbox app from the app store and use your account information to sign in.  You will then need to download the app “MiniKeePass”.

To load your password database into MiniKeePass, open the Dropbox app (or your Cloud app) and click on your *.kdbx file.  The cloud app will not be able to show a preview of the file, which is expected.  Click on the icon of the square with an arrow pointing up, which should give you a menu with multiple options.  Click the “Open in…” option and select “Copy to MiniKeePass”.  This has now stored a copy of the password database in your MiniKeePass app.  This is important to note as it is just a copy.  If you make changes to the file on another device, you will have to go through the process of loading your password database again.

The actions above will open MiniKeePass and display the database file. To open it, click on the filename.  The app will ask for the database password.  Enter your password and your database will display.  You can browse by folder or you can use the “Search” box.  To use the passwords, click on an entry and click on the username or password.  This copies that text to the clipboard.  You can then paste it wherever you would like.

Retrieving Passwords on your Android 

If you want to access passwords on your Android, you need to download the app for the cloud that you are using. In the case of Dropbox, you will download the Dropbox app from the app store and use your account information to sign in.  You will then need to download the app KeePass2Android from the app store.  Launch the newly downloaded app and click the “Open File” button.  You can browse to your password database file in your cloud and open it with your password.  You will then be able to search for the password that you want and copy/paste it any location.

Retrieving Passwords on your Chromebook

If you are using a Chromebook, there is a strong possibility that the cloud that you are utilizing is Google Drive.  Place your *.kdbx file in your Google Drive cloud and install the KeePass Chrome app.  Open your new app and select “Open File”.  Browse to your KeePass Database and enter the password.  KeePass Chrome will open the file and you can use the passwords as needed.

Keeping Your Information Safe In the Digital Age – Part 2

With the onslaught of data breaches that happened in 2015 (about 65,000 according to the Verizon Data Breach Investigations Report), INF presents this multi-part blog series about keeping your data safe in the digital age.

Password Management Programs

As promised in Part 1 of this series, this blog entry will cover setting up and using a password management program.  There are many good password management programs available, such as LastPass, KeePass and 1Password, and the cost of the program varies anywhere from free to around $100.  If you are like most users, you need a password management program to:

  • Create unique, strong passwords for all accounts, new and old
  • Be an easily searchable repository for all passwords
  • Remind you when to change your password
  • Keep track of the security question answers that you created

Fortunately, there are multiple free programs that fit the above criteria.  KeePass does all of the above and more.  It is free and open source, which means that there is no chance of a security issue, because there are thousands of developers that have reviewed the code.  In this article, we will cover the installation, setup and a few highlights of this program.

How to Set Up KeePass 

To download the latest version of KeePass, go to: http://keepass.info/download.html.  We recommend downloading the most recent version of the “Professional Edition”.  The download link will take you to Sourceforge, which is where the download is stored.  Save the setup file and then run it.  Select your language and accept the agreement.  Most people allow the program to be installed on the C drive.  Install the program, keep “Launch KeePass” checked and click “Finish”.

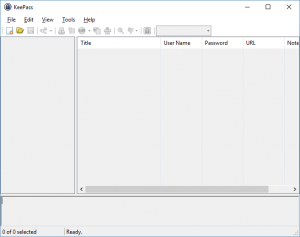
KeePass will launch, as shown below:

Image1KeePassBlank

The first thing to be done is to create a new database file that will store all of your passwords.  Go to File > New.  This will bring up a dialog box, asking you the location to save your password file.  We recommend saving it in a cloud, such as Dropbox or Microsoft OneDrive.  This way, you will be able to access your database from any device that has access to your cloud account.  Take note, the file extension will be “.kdbx”.  Name your file, then click “Save”.

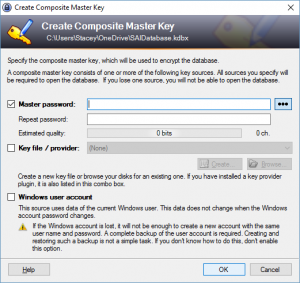
This will bring up the dialog box to create the master key:

Image2MasterPassword

The master key is simply the password that you need to open the database file.  This will be the only password that you need to remember from now on, so you need to make it secure.  See Part 1 of this blog series for tips on creating a secure password.  Enter your master password twice and click “OK”.

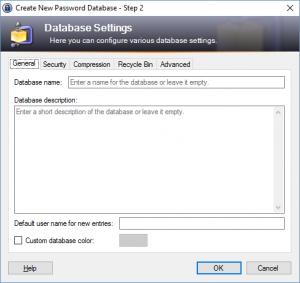
This brings up the next dialog box, which specifies the settings for the password database:

Image3DatabaseSettings

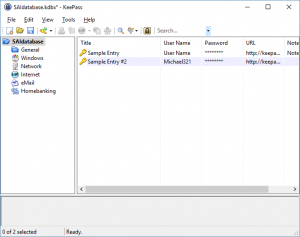
The default settings are adequate, so no need to change them.  Press “OK” and you are done with the setup.  KeePass will be opened to your new database.

Image4EntriesInKeePass

Creating a New Entry in KeePass

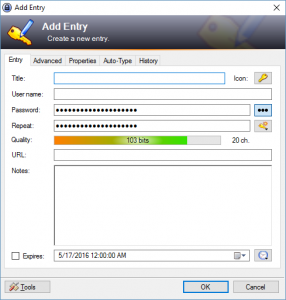
To create an entry in KeePass, click the “Add Entry” button (the yellow key) or press Ctrl + I.  The “Add New Entry” dialog box will appear:

Image5AddEntry

The title field should be a description of the username and password that you are going to enter, such as “Susan’s PNC Bank Account” or “Andrew’s Chase Visa Credit Card”.  The username field should be your username, which is normally an email address.  By default, KeePass provides a 20-character alphanumeric password.  To display this password, click on the button with three dots to the right of the password field.  If you would like to change the character set or length, click on the “Generate a Password” button (it looks like a key with an orange burst) and select “Open Password Generator”.

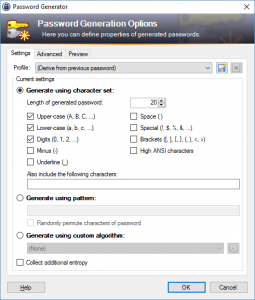
This will open the Password Generator window:

Image6PasswordGenerator

Select the character set checkboxes that you would like the password generator to use.  You can also change the length of the password.  Once you have the settings to your liking, select “OK”.  The password will now use the settings that you selected.

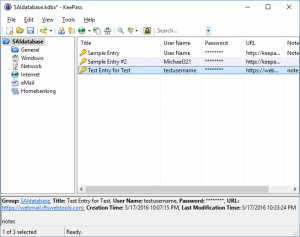
The other option is to enter your own password.  You can delete the one that is generated and enter your own.  Fill in the URL field with the web address of the sign-in page that corresponds to the username and password.  You may choose to put in an expiration date for the password as well as set a reminder alarm.  Finally, if you have any notes that go with this entry, such as a security question/answer combo, you can enter it in the “Notes” section.  Once the password entry is to your liking, select “OK”.  You will now see your entry in the main right-hand window pane.

Image7TestEntries

To edit the entry, double-click on the title and the “Edit Entry” dialog box will pop up:

Image8EditEntry

Make any necessary changes and press “OK”.  To save your database, click on the “Save” button, which looks like a blue disk.  You will want to create an entry for every password that you have.

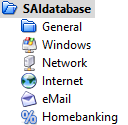
To help you organize your passwords, KeePass provides categories on the left-hand side of the main window.  Simply drag and drop your entries into the categories that they belong to.  You can also add categories, if the existing ones do not fit your needs.

Image9LefthandWindow

Using your KeePass Database

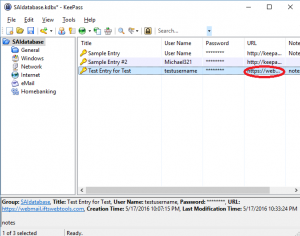
Now that you have populated your database, the next step is using it!  To open your browser to the sign in page of an entry, double-click on the “URL” field in the right-hand window pane or highlight the entry that you want to use and press Ctrl+U.

Image10URL

Your browser window should automatically open to the sign-in page corresponding to that username and password.  If the page has both the username and password fields on it, put your cursor in the username field and then go back to KeePass.  Make sure that entry is highlighted and press Ctrl+V.  This will automatically fill in the username and password in the browser.

Alternatively, if you want to enter the username and password yourself or if they are on separate pages, you may do the following:

  • Double click on the “URL” field in KeePass to open a browser to the sign-in page
  • Go back to KeePass and double click on the “Username”
  • Go back to the browser, put your cursor in the “Username” field and press Ctrl+V to paste the username
  • Go back to KeePass and double click on the “Password” field
  • Go back to the browser, put your cursor in the “Password” field and press Ctrl+V to paste the password

Please keep in mind that KeePass only keeps the fields copied for 12 seconds, so you must do the steps above fairly quickly.

Part 3 of this series will cover accessing your password database on different devices.